![]()
![]()
|
HAMS-GPS
Accident Analysis Help |
1.
Introduction:
HAMS-GPS Accident Analysis module is an advanced MS-Access 2000 based database management software. Accident Analysis is done in conformity with IS: 3786-1983 on “Methods for Computation of Frequency and Severity rates for Industrial injuries and Classification of Industrial Accidents". This module requires record of accidents in various parameters. After successful installation, to load the Accident Analysis software module, click start button on the desk top tool bar, point curser on "Programmes" option, point curser on "Hams-gps Safety Software" option and click on "Accident Analysis" option:
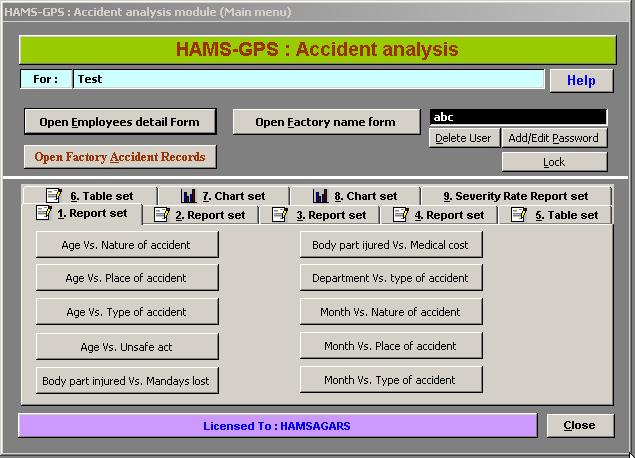
You will find the "HAMS-GPS : Accident Analysis Module (Main menu)" displayed (Fig.-1).
Shortcuts: There are several shortcut commands shown by underlined letters/numerals and these may be used for speedy running of the module.
|
|
|
FIG.-1 |
Click on "Open Employee Detail form" button or press E (shortcut). You will find the "HAMS-GPS : Employee Detail form" opening (Fig.-5). You can study and acquaint with the various personnel and accident related parameters and shortcut keys. (Note: Shortcut Keys do not work if the curser focus is in any edit or combo box. In such cases you have to press "ALT + Shortcut Key"). Return to "HAMS-GPS Accident Analysis Module (Main menu)" by closing the "HAMS-GPS : Employee Detail form". If the close button is disabled, press Tab key to remove focus from ESI number edit box and then click "Close" button or press C-Key (Shortcut).
Note:
a. Accident Analysis Module is more complex programme and therefore, the programme should be run only by well trained persons for the purpose.
b. For beginners, it is necessary to print this help file and keep it before you when you start using the Accident Analysis Module for the first time.
c. Following are the 10-main Does and Don'ts for this Programme. There are more important points highlighted in red test:
| Sr. No. | Does | Don'ts |
|
1. |
Do print this Help file and keep it before you and refer every step when you use the programme for the first time. | Do not start using this Programme without properly studying the help file. |
|
2. |
To begin with, it is necessary to set Factory name (Clause-2.1) | Don't start first time without entering the Factory name. |
|
3. |
Next Enter Shift Timings (Clause-2.2) | Don't proceed further without fulfilling clause2.1 and 2.2. |
|
4. |
Create Employee records only for those employees who have met with accident and not for others (Clause-3) | Don't create Employee records for those who have not met with accidents. |
|
5. |
You can, however, add all your departments in the "Department" combo (Clause-5), even if there are no accidents in that department. | The strength of the department and man hours worked should not be entered unless accident is there. Otherwise the reports on severity/frequency and percent accidents to total strength would be wrong. |
|
6. |
You should click "Add Record" button on the "Employee Details form" Dialog Box only for creating a new Employee Detail Record. | If by mistake you have clicked the "Add Record" button on the "Employee Details form" and do not want to add any new employee detail record, then press enter or Tab or remove focus of curser from ESI number Text box to "Enable" the disabled "Close" button and close the "Employee Detail record" form and reopen it. |
|
7. |
Use only Alpha Numeric Text in Combo Box options | Never use an Apostrophe ' sign. |
|
8. |
Always retain the original name of the programme "accid_analy.mde" | Never rename the programme file "accid_analy.mde" |
|
9. |
Operate only those keys that are required and relevant. | "Page down" Key should not be operated as this might change the entries in the text boxes. If by mistake you have pressed "Page down" Key reverse it by pressing the "Page up" Key. |
|
10. |
The Accident Analysis Programme can take maximum of 4-Years accident records. After this you have to back up the file and restart after deleting all the records. | Don't try to add accident records of more than 4-Years. |
2. Steps for creating
accident records for a new factory:
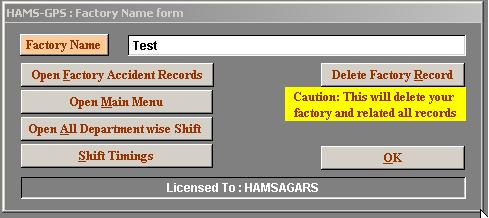
3. Create Employee Details for all the employees that have met with accidents.From the Accident Analysis Module (Main menu) now click on "Open Factory Name" button or press F-Key (Shortcut) when the following "HAMS-GPS: Factory Name form" (Fig.-2) opens. "Delete Factory Record" button or press R-Key (Shortcut). This form (Fig.-2) now shows the default factory as "Please enter Factory name", replace this by your factory name and press Enter or click "OK" button. A a message box comes. warning that your records are about to be deleted. Click "OK" button of the Message Box.
FIG.-2
Another Message Box as in Fig.-3.
Follow the following steps:
i. Please note the contents (Fig.-3) and click "OK" on the Message box.
FIG.-3
ii. Click "Refresh" button on the Accident Analysis Main Menu or press R-Key (Shortcut).
Note: The Accident Analysis Module takes only one factory name.
2.2 Entering Shift Timings:
i. Then open "Factory Name form" again and click on "Shift Timings" button or press S-Key (Shortcut).
FIG.-4
ii. The above Shift Timing dialog opens (Fig.-4). Select Number of shifts worked and start selecting shift timings in the "From" and "To" Combo boxes starting with the General Shift for all the shifts worked and click on "Done" button. Note that the computer does not check any of the entries and therefore, you have to physically ensure that the shift timings selected are accurate.
iii. Click "OK" on the Factory Name Form.
Note: You can Rename or Edit Factory Name if you want, by changing in the Factory Name Text box in the "Factory Name form" and by this all records remain unaltered. However, to start a New Factory Record, you have to click "Delete Factory Record" button and proceed further as described under 2.1 above.
NOTE: You MUST Enter Shift Timings before opening accident records Form and entering accident records.
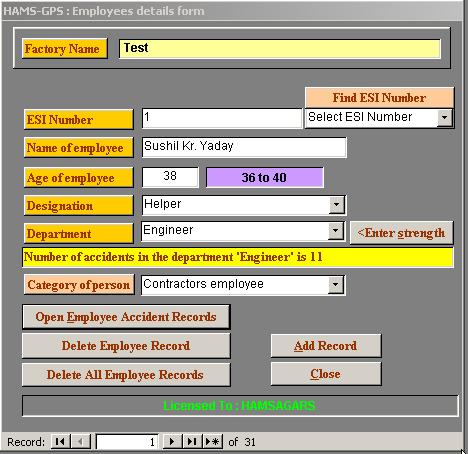
On the "Accident Analysis Module (Main menu Form)" click on "Open Employee Detail Form" button or press E-Key (Shortcut). The following form (Fig.-5) opens. This is the form where you have to create Employee Details only for those employees who have met with accidents and not for any other employee. This form has optional buttons for the following:
a. "Open Employee Accident Record" (Shortcut: O-Key): This opens form shown in Fig.-7
b. "Delete Employee Record": You can delete the Employee Record that is displayed.
c. "Delete All Employee Records": Deletes all Employee Records.
d. "Add Record" (Shortcut:
A-Key): Opens a blank
"Employee Detail Form". You can also access this balk form by
operating the Select Employee from the "Form Navigation button
bar" ![]() at
the base of the form that Navigate through each record forward and backward through all the
records.
at
the base of the form that Navigate through each record forward and backward through all the
records.
Note: The "Form Navigation button bar" has the following buttons (Buttons referred to from Left to Right)::
i. First button (I<): First record button. This displays the first record.
ii. Second button (<): Previous record button. This displays the record previous to the one displayed (Disabled if it is the v3ry first record).
iii. Middle Text box displays the record number displayed.
iv. Third button (>): Next record button. Displays the record next to the one displayed.
v. Fourth button (>I): Last record button. This opens the last record in the list of records available.
vi. Fifth button (>*): New record button. This opens a blank form.
vii. At the end there si display of Total number of Records.
e. Click on "Enter strength" button opens "HAMS-GPS Department details" Form (Fig.-10) where you can add the strength of only the department selected in the "Employee Detail form". You can, however, add strength of all departments only for those departments where accident records are created, as described under Clause-5.2.
f. There is a non-editable Yellow test
display showing the number of accidents in the department to which the current
display belongs. If there are no accidents, there will be "#Error"
display. If there are accidents, the total number of accidents will be
displayed.
|
|
|
FIG.-5 |
Among the parameters of Personnel Details, there are four critical parameters:
- ESI Number.
- Department
- Designation
- Category of employee
Note:
a. It is necessary to enter these records only for each employee who have met with accidents and create the Employee Record before proceeding to create the accident records,.
b. You can, however, add all your departments in the "Department" combo (See Clause-5 below), even if there are no accidents in that department. But in this case, the strength of the department and man hours worked should not be entered otherwise the reports on severity/frequency and percent accidents to total strength would be wrong.
c. In case an employee has been transferred or promoted and his department /designation/category has changed then give him/her a Modify ESI Number by a Prefix/Suffix to indicate his changed status and create a new Employee record where in his/her name also will be modified by a suitable Prefix/Suffix.
d. In case you have made wrong entries for Department, Designation or Category for any employee, you can correct your entry in the Employee Detail Form and then open Employee Accident Records whereby the first Accident Record automatically gets corrected. If there are more than one accidents then select the next record and click on "Update" Button for each accident record.
e. You click "Add Record" button on the "Employee Details form" Dialog Box only for creating a new Employee Detail Record only. If by mistake you have clicked this and do not want to add any new employee detail record, then press enter or Tab or remove focus of curser from ESI number Text box and close the Employee Detail record form and reopen it.
Caution: Do Not Create any Employee Record for those who have not met with accident. If this is done the reports with employee related details will not be accurate. So always crate Employee Details Record when there is an accident, if his/her name is not already there.
Actual ESI-Number if not available, any series of Alpha-Numerical or merely Numerical numbers may be provided.
The name of Employee is not important and may be kept blank. If name is entered, there cannot be duplication. If two employees have the same name differentiate by using -1, -2 as suffixes or Jr., Sr. or any other. If by mistake a duplicate ESI-Number is entered, a duplication error message comes (Fig.-6).
|
|
|
FIG.-6 |
In that case, Click "OK" on the Message Box and the duplicate ESI Number can be found from "Find ESI Number" Combo Box and select the ESI Number from the Combo Box to get all the data of that ESI Number.
Note:
a. In case of more than one accidents of the same person, there is a method of entering the duplicate accidents of the same employee for which see under Clause-3 below.
b. You can change the ESI Number already entered any time later from Employee Detail record Form and by this all related accidents get related to the new ESI number. However, the new ESI cannot be a duplicate of another already entered ESI number.
c.
Age is important and not critical.
The moment you enter the age as a decimal value, the age group is displayed automatically.
The Accident reports relating to age always refer to the age groups.
After you have created Employee Details Record,
now click select the employee in
the "Employee Details Form" whose accident is
to be recorded and then click on "Open Individual Accident Record
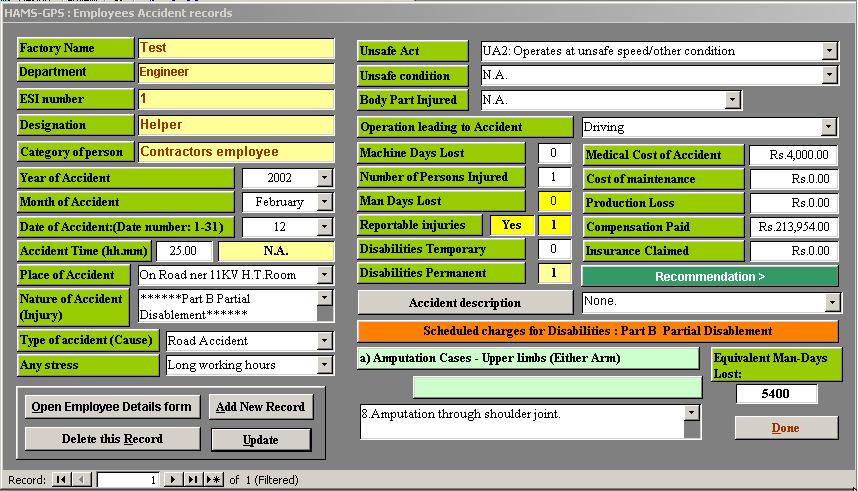
Form" button. The "Individual Accident Record Form" (Fig.-7) has the
following 29-Parameters.
|
|
Form Navigation Button bar (See Note on this in Clause-3)
|
FIG.-7 |
Factory
Name (Read only)
Department
(Read only)
ESI Number
(Read only)
Designation (Read only)
Category
of person (Read only)
Year of accident
Month of accident (Combo
box)
Date of accident (Combo
box)
Accident time (Combo
box)
Place of accident (Combo
box)
Nature of accident
(Combo box)
Type of accident (Combo
box)
Unsafe act (Combo box)
Unsafe condition (Combo
box)
Body part injured (Combo
box)
Operation leading to
accident (Combo box)
Number of persons
injured
Man days lost
Machine days lost
Disabilities temporary
Disabilities permanent
Number fatal
Medical cost of accident
Cost of maintenance
Production loss
Compensation paid
Insurance claimed
Reportable injuries
Recommendations (Combo
box)
4.1 Note the following points for data entry in the Employee Accident record:
a.
The first four data in data entry text boxes are derived from personnel data and
cannot be edited. So you can create/edit the accident record for the employee
whose parameters are displayed in the first four data entry boxes. You can add
new accident record for the same person by clicking the "Add
record" button. For another employee accident record, go to "Employee
Detail form" and create/select another employee detail record and then
click "Open Employee Accident Record form" and start recording
data for this employee.
b The other data are to be entered. All except parameters from 16 to 27 have combo box selection of the parameter. For any new item is to be created in any of the fields having combo selections, see Clause-5 below.
c. For each of the Text combo boxes, there is a data
"N.A." for data "Not Available". This may be used if the data is not
available. For date the not available data is kept as "0" which may
be selected if the date of accident is not known and this is most unlikely.
d. For
numeric data Combo boxes, other than cost data, if not available or the value is NILL, leave the default value as
"0".
e. For cost data which have no combo box selection the default data is "Rs. 0.00", if there is no data, simply do not enter any thing and leave the default "Rs. 0.00".
f.
For Time of accident, enter time in "hh.mm". Note "mm"
should not be 60 or more. For integral hours, you may just enter only integral
time and ignore mm entry. Thus "02.00" may be entered simply as
"2". If you enter 60 or more mins. the
computer will not read it nor any error message comes. So user has to ensure
that minutes entry remains between 0 and 59. The Time of accident entry,
on loosing focus, is converted in to Time groups and displayed in the Yellow box
and this Time Group value will be used in the Time related Accident Reports.
g. Man-days lost data entry if greater than or equal to 2-days, then the yellow box shows Reportable accident as 1 and reportable accident integrated value will be used in corresponding reports..
This way complete all the Individual accident records.
If there are more than one person injured in an
accident, the name of employee will be the name of the person who was primarily
responsible for the accident. The others are just victims of the accident and
appear merely as numbers under the Parameter-17 "Number of Persons
injured".
4.2 About the button options on the "Employee Accident Record Form":
This dialog box has the following button options:
a. "Open Employee detail form": Brings the "Employee Detail form" to the front. Note, while working with the "Employee Accident Record form" the "Employee Detail form" should not be closed. It should remain in the background.
b. "Add new record": You click "Add Record" button on the "Employee Details form" Dialog Box only for creating a new Employee Detail Record only. If by mistake you have clicked this and do not want to add any new employee detail record, then press "Enter" Key or "Tab" Key or remove focus of curser from ESI number Text box and close the Employee Detail record form and reopen it.
5. Creating new items and deleting existing ones from the Combo Box:
Preliminary Notes:
a. Year combo shows a default year. You can select the year of accident. The "Year" Combo has Years 0000, 1999, 2000 to 2008. The year 0000 is a reserved year and cannot be deleted or changed. You can create new year if need be as described below.
b. The following Combo boxes have fixed options Under Accident Record and the user cannot add or delete any options under these Combo boxes:
i. Month
ii. Date of Accident
c. Under Unsafe Acts and Unsafe Conditions, the options are as per Heinrich's standard options and it is recommended that the user makes use of only the standard options and not try to create new Unsafe Acts and/or new Unsafe Conditions as this would be unscientific..
5.1 For the rest of the Combo boxes, the user may add or remove the options as under:
i. Double click on the Combo Box where alterations/deletion/addition are required. This opens the related form. An example of such alterations/deletion/addition Form is shown below (Fig.-8):
|
|
|
FIG.-8 |
You can then use "Delete", "ADD" buttons to Delete or Add respectively. If you wish to modify then you can do so in the Text box. The Accident Analysis Module gives several default department names. You should delete those default departments already in the Department Combo box but not existing in your factory and create those departments that are existing in your factory but not there in the Department Combo box. Ensure that the Department Combo box has all those departments that exist in your factory and none else.
Caution:
Option Entry in any Combo Box cannot have the Apostrophe sign '
5.2 Adding Shift strength and Man-hours worked in each month of Departments in use (Where accident records are created):
You must add the shift strength and Man-hours worked for all your existing departments irrespective of whether accident records exist or not in that department. For this go to "Factory Name Form" (See Fig.-2) and click on "Department Wise Shift Form" button or press D-Key (Shortcut) whereby the following dialog box (Fig.-9) opens where you select the department from the list box and enter the shift strength for each shift. :
|
|
|
FIG.-9 |
Note: The Shift strength is not fixed and keeps varying daily. So first you can enter an estimated value. At the end of a month you may edit the Shift Strength based on actual monthly average and keep on updating to bring the Shift Strength with the yearly cumulative average Shift Strength. The Shift strength should include all those exposed to the Hazards and who are likely to meet with an accident and thus should include the regular company employees, apprentices, temporary employees, casuals, contractor's employees and even visitors who can also meet with an accident. So the actual Shift strength will be known at the end of the month only and the shift strength should be updated to show the cumulative average month after month for each year. The reports affected by shift strength are the Strength to % Accidents which are available for each year or part thereof during the course of the year. Similarly for the Man-hours worked.
After this, click on "Man hours worked month wise" button or press W-Key (Shortcut), when the following dialog box opens showing the department selected in the "Department detail" dialog box and you can click on "Click and Select Month" button and then on the Month in the "Month Combo box" to select the month and enter the corresponding man-hours worked in each shift for the department. Then click "Done" button and select and other department in the "Department detail" dialog box (Fig.-9) and click "Man hours worked month wise" button and repeat shift wise Man-hours worked:
|
|
|
FIG.-10 |
6. Cases of more than one Accident of an Employee:
In case an Employee has more than one accident, follow the steps given below:
i. Open the "Employee Details Form".
ii. Open the "Find ESI Number" Combo Box and select the required ESI number thereby the required "Employee Detail Record" is displayed.
iii.
Click on the bottom line "Form Navigation button bar's"
![]() third
button (for next form) or Fifth button (for new record form) from left, opens
the next blank
record form and enter the second accident of the same employee (For details on
the "Form Navigation button bar" see Clause-3 above).
third
button (for next form) or Fifth button (for new record form) from left, opens
the next blank
record form and enter the second accident of the same employee (For details on
the "Form Navigation button bar" see Clause-3 above).
7. Scanning Factory wise accident records:
After creating all the Individual accident records for a factory, you can view the complete factory wise records by clicking on “Open Factory Accident Records” button or press F-Key (Shortcut) in the “Factory Name form”. This opens the "All Employees Accident Records" form (Fig.-11). This form is editable. You can navigate through each of the accident records one by one by using the "Form Navigation button" (See Clause-6 above) and also edit/delete any record. In the "All Employees Accident Records" form, you have the following optional buttons:
i. "Open Employee Detail form" (Shortcut: O-Key),
ii. "Delete this Record" (Shortcut: R-Key). Deletes the displayed record only,
iii. "Delete All Accident Records" (Shortcut: A-Key). Deletes all Accident records (Caution: This will delete all accident records of your factory).
iv. "Binocular" button opens you to "Find/Replace" dialog box. This has two options. One is "HAMS-GPS All Employees Accident records" and "Selected Parameter value search". Normally use only "Selected Parameter value search" option. For this focus curser in the Text/Combo box you wish to search and click on "Look into" Combo box of the "Find/Replace" dialog box whereby the parameter to be searched is displayed. Now enter the value or text to be searched in the parameter to be searched and proceed. You can also use "Find and Replace option" where you enter both parameter value to be searched and the value to be replaced.
|
|
|
FIG.-11 |
After creating all the Individual accident records go
to Main menu and simply click on the button for which you need the report.
There are tables and chart reports. Following is the list of reports in table
and charts. You can print these reports and charts, interpret and write the
report on Accident analysis:
|
MIS-Reports
in Tabular form |
|||
|
Sr. No. |
MIS-Report
on |
Sr. No. |
MIS-Report
on |
| Table set-1 | Table set-3 Contd. | ||
|
1. |
Age vs. Nature (injury) |
32. |
Age vs. Count of accidents |
|
2. |
Age vs. Place |
33. |
Body part injured vs. vs. Count of accidents |
|
3. |
Age vs. Type (Agency) |
34. |
Category of employee vs. Count of accidents |
|
4. |
Age vs. Unsafe Act |
35. |
Month vs. Count of accidents |
|
5. |
Body part injured vs. Man days lost |
36. |
Nature vs. Count of accidents |
|
6. |
Body part vs. Medical cost |
37. |
Operation leading to accident vs. Count of accidents |
|
7. |
Department vs. Type |
38. |
Place vs. Count of accidents |
|
8. |
Month vs. Nature (Injury) |
39. |
Time vs. Count of accidents |
|
9. |
Month vs. Place |
40. |
Type vs. Count of accidents |
|
10. |
Month vs. Type (Agency) |
41. |
Unsafe Act vs. Count of accidents |
| Table set-2 |
42. |
Unsafe condition vs. Count of accidents |
|
|
11. |
Month vs. Unsafe condition |
43. |
Employees with more than one accidents |
|
12. |
Nature vs. Body part injured |
44. |
Accident record table for the year. |
|
13. |
Operation vs. Nature (Injury) |
45. |
Reportable injuries (Overall, Month, Year and date) |
|
14. |
Operation vs. Type (Agency) |
Table set-4 | |
|
15. |
Place vs. Nature (Injury) |
46. |
Year vs. Count of accidents |
|
16. |
Time vs. Body part |
Table set-5 | |
|
17. |
Time vs. Nature (Injury) |
47. |
Age vs. Count of accidents |
|
18. |
Time vs. Place |
48. |
Body part vs. Count of accidents |
|
19. |
Time vs. Type (Agency) |
49. |
Category of person vs. Count of accidents |
|
20. |
Time vs. Unsafe Act. |
50. |
Department vs. Count of accidents |
| Table set-3 |
51. |
Month vs. Count of accidents |
|
|
21. |
Type vs. Body part |
52. |
Nature (Injury) vs. Count of accidents |
|
22. |
Unsafe Act vs. Body part |
53. |
Operation leading to accidentg vs. Count of accidents |
|
23. |
Unsafe Act vs. Nature (Injury) |
54. |
Place vs. Count of accidents |
|
24. |
Unsafe Act vs. Recommendation |
55. |
Time of accident vs. Count of accidents |
|
25. |
Unsafe condition vs. Type (Agency) |
56. |
Type (Agency) vs. Count of accidents |
|
26. |
Unsafe condition vs. Recommendation |
Table set-6 |
|
|
27. |
Category of employee vs. Nature (Injury) |
57. |
Unsafe act vs. Count of accidents |
|
28. |
Category of employee vs. Unsafe Act |
58. |
Unsafe condition vs. Count of accidents |
|
29. |
Category of employee vs. Unsafe condition |
59. |
Employees with more than one accidents |
|
30. |
Type vs. Nature (Injury) |
60. |
Accident records for the year. |
|
31. |
Year vs. Count of accidents |
61. |
Month wise, Year wise and date wise accidents |
|
MIS-Reports in Graphic bar chart form (Year wise and overall i.e. all years) |
|||
|
1. |
Age vs. Count of accidents |
8. |
Unsafe Act vs. Count of accidents |
|
2. |
Body part vs. Count of accidents |
9. |
Unsafe condition vs. Count of accidents |
|
3. |
Nature (Injury) vs. Count of accidents |
10. |
Department vs. Count of accidents |
|
4. |
Operation vs. Count of accidents |
11. |
Category of employee vs. Count of accidents |
|
5. |
Place vs. Count of accidents |
12. |
Month vs. Count of accidents |
|
6. |
Time vs. Count of accidents |
13. |
Designation vs. Count of accidents |
|
7. |
Type (Agency) vs. Count of accidents |
14. |
Year vs. Count of accidents |
|
MIS-Reports
on Accident Rating |
|||
|
1. |
Frequency/Severity Ratings |
2. |
Strength of department and % accidents |
Note: The Charts display is on one page only while the Reports may be in more than one page and the various pages may be scanned by selecting the bottom of the page select option.
8.1 How to use the Reports: There are a large number of reports both in tabular and graphic forms. There are two types of Tabular reports:
i. Tabular reports showing Relations between two Causative Parameters of Accidents. e.g. Type of Accident Vs. Nature of Accident. Examine these tables and note only those Relations where major number accidents have taken place and examine possible control/prevention methods. Some of the most useful tables in this category are the following:
a. Department Vs. Other parameters (Specially Nature and Type): Show Department wise control needs of accidents,
b. Operation leading to accident Vs. Other parameters (Specially Nature and Type): Show Operation wise accident control needs,
c. Designation Vs. Other parameters (Specially Nature and Type): Show designation wise control needs for accident prevention,
d. Age Vs Other parameters (Specially Nature and Type): Show age wise control needs of accidents.
ii. Tabular reports showing Accident parameter Vs. Count of accidents. e.g. Type of accident Vs. Count of Accidents. These are the most simple and obvious reports and easily help in understanding and developing control methods. All these tables of Accident parameter Vs. Count of accidents are also available in Graphic form as Bar charts. Make the maximum use of these in chart form in your accident control programme. Select normally the top-5 maximum count of accidents and develop control procedures and when this is achieved, go the other lower ones and work on them. Some of the most useful Accident Parameter Vs. Count of accidents type tables and graphs
include the above 5-types where the second parameter is "Count of accidents" as under:
a. Department Vs. Count of Accidents: Show Department wise control needs of accidents,
b. Operation leading to accident Vs. Count of Accidents: Show Operation wise accident control needs,
c. Designation Vs. Count of Accidents: Show designation wise control needs for accident prevention,
d. Age Vs Count of Accidents:: Show age wise control needs of accidents.
iii. Accident Rating Reports: The Frequency/Severity Reports show the number of accidents (Frequency) and Number of Man-days lost (Severity) per million man-hours worked. There are two types- One is all injuries and the other is reportable injuries. Your Frequency/Severity values may be compared year after year, or even Six Monthly/Quarterly, for corresponding period of previous year and see the trend. You must examine the adverse trend and set targets to lower the best performance achieved. Note: Before taking the Frequency/Severity reports you must update the man-hours worked for each department shift wise up to date. Otherwise the results will be wrong.
iv. Strength Vs. % Accidents Reports: These are also of two Types- One % Accidents in a department to Department strength and Two % Accidents in a department to strength of the department. These reports compare the relative percentage of accidents in each department and help create a competition among departments to compete with one another. Of course the accidents depend on the hazard levels of activity, but the effort is to effectively control the hazards and make the accident incidence comparable and compete among all departments.
9. Printing your Accident Analysis Reports:
Follow the normal procedure for printing any display by selecting the appropriate printer and you may have to set page margin, Page layout accordingly from page setup.
Note : For Print Preview, it is necessary to have a printer installed default Printer in the PC/Network system you are operating. Otherwise the Print Preview or Printing will not be possible. For printing use inkjet/laser jet printer for good results.
10. Incase you have to start a new Factory Name Data or Start fresh records:
You can save the existing records as under:
i. Back up your database records (Go to Startup>Programs>Hams-Gps Safety Software>Database Modules and Click Backup database)
ii. You may now delete from Factory name record form.
iii. Begin afresh by entering the Factory. If it is the same Factory but for a different period you may use the Period after the Factory name.
11. Back up a database.
CAUTION: Never rename the original Accident Analysis Module Name (accid_analy.mde).
Method-A (Recommended being very simple): To prevent loss of your data base due to HD-curruption etc., it is desirable to keep a back up of the "accid_analy.mde" file periodically on a rewirtable CD or any other media using any copy programme.
Method-B: The Accident Analysis Module (accid_analy.mde) has also an option for back up: (This back up procedure is based on MS-Backup which must be installed)
i. Close the database. If you are in a multi-user environment, confirm that all users have closed the database.
ii. If your are using Microsoft Backup software, Go to Startup>Programs>Hams-Gps Safety Software>Database Modules and Click Backup database. The following dialog box opens (Fig.-12)
|
|
|
FIG.-12 |
iii. Select "Create new job" Radio button (This is a default selection) and click "OK" button whereby the following "Backup wizard dialog" box opens (Fig.-13). Select "Back up selected files and drives" and click next.
iv. Go to the file folder where Accident Analysis Module is installed, check the file of accident analysis ( accid_analy.mde ) for back up and click "OK" button for back up.
|
|
|
FIG.-13 |
Restoring the Back up:
If you have kept your back up of Accident Analysis Module by Method-A, to restore simply overwrite on your file.
If you have kept the Back up by method-B then you have to follow the MS-Back up programmes Restore option. For details see Help file of the MS-Back up.
When restoring, always restore to it's original location and always replace files.